> ## Documentation Index
> Fetch the complete documentation index at: https://docs-dev-feat-init-gt-translations.mintlify.site/llms.txt
> Use this file to discover all available pages before exploring further.
> ロールベースのアクセス制御を実装するための Authorization Extension の設定方法を学びます。
# Authorization Extension を設定する
Auth0 では、ロールベースのアクセス制御 (RBAC) を実装するための 2 つの方法が提供されており、API 独自の内部アクセス制御システムの代わりに使用することも、組み合わせて使用することもできます。
* [Authorization Core](/docs/ja-jp/manage-users/access-control/rbac)
* [Authorization Extension](/docs/ja-jp/customize/extensions/authorization-extension)
Authorization Core の機能セットは Authorization Extension と同等の機能を備えており、パフォーマンスとスケーラビリティが向上しているほか、Authorization Extension よりも柔軟な RBAC システムを提供します。
現在、どちらも RBAC の主要な機能を実装しており、API に対して定義されたカスタムスコープを、権限としてユーザーに割り当てられたものだけに制限できます。
Authorization Extension で認可ロジックを適用できるようにするには、まずログイントランザクション中にどのように動作するかを設定する必要があります。設定内容は、実行時に動作する [ルール](/docs/ja-jp/customize/rules) に保存されます。
事前準備
[Authorization Extension をインストールする](/docs/ja-jp/customize/extensions/authorization-extension/migrate-to-authorization-extension-v2)
1. [Auth0 Dashboard > Extensions](https://manage.auth0.com/#/extensions) に移動し、**Auth0 Authorization** を選択します。
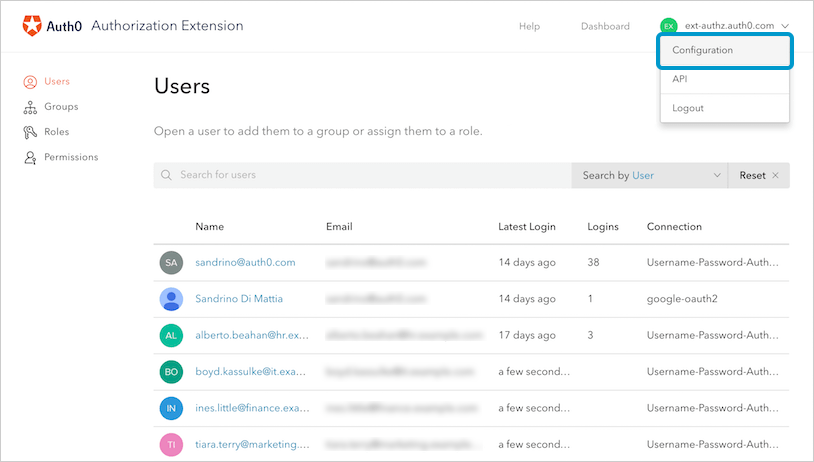
2. **Authorization Dashboard** の右上にある **Configuration** を選択します。
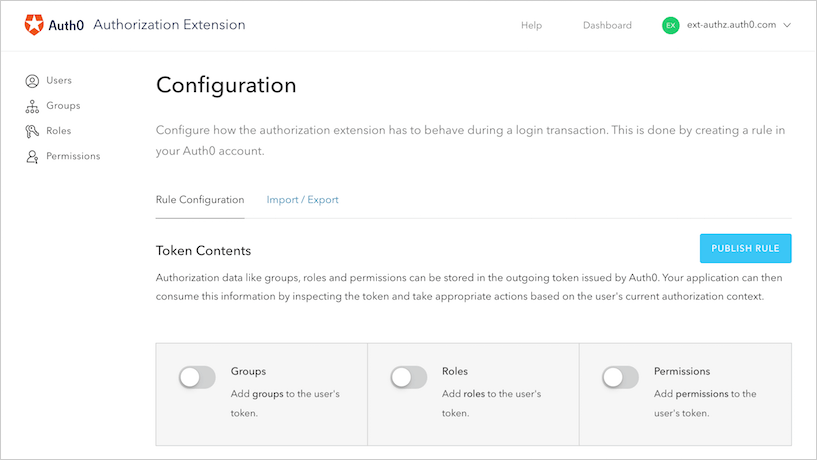
 3. **Configuration** ページの **Rule Configuration** セクションが開きます。**Token Contents** 配下の各セクションで行った変更 (グループ、ロール、権限に関するものなど) はすべて、この手順の完了時にエクスポートするルールに反映されます。
ApiKey
このルールは、Authorization Extension API と通信してポリシーを取得するために、ApiKey を使用します。ApiKey はルールの設定として保存され、ルールの公開時に自動的に作成されます。ApiKey をローテーションするには、**Rotate** ボタンをクリックします。ApiKey がローテーションされると、ルールの設定も自動的に更新されます。
Auth0 が発行するトークンには、グループ、ロール、権限などの認可データを格納できます。アプリケーションは、トークンを確認してこの情報を利用し、ユーザーの現在の認可コンテキストに応じた適切なアクションを実行できます。
発行されるトークンにグループ、ロール、権限の情報を追加するには、含める項目の横にあるスライダーを有効にします。
トークンに保存するデータが多すぎると、パフォーマンスの問題が発生したり、トークンを発行できなくなったりすることがあります。必要なものだけを保存するようにしてください。すぐに利用できる大量のユーザーデータが必要な場合は、データをトークンに追加する代わりに、永続化の利用を検討してください。
IdP から認可データをマージする
Active Directory など、現在使用しているアイデンティティプロバイダー (IdP) からグループ、ロール、または権限を受け取るユーザーがいる場合があります。これらの項目を Authorization Extension で定義した項目とマージして保持したい場合は、該当する **Passthrough** オプションを有効にしてください。有効にしたいマージ項目の横にあるスライダーをオンにします。
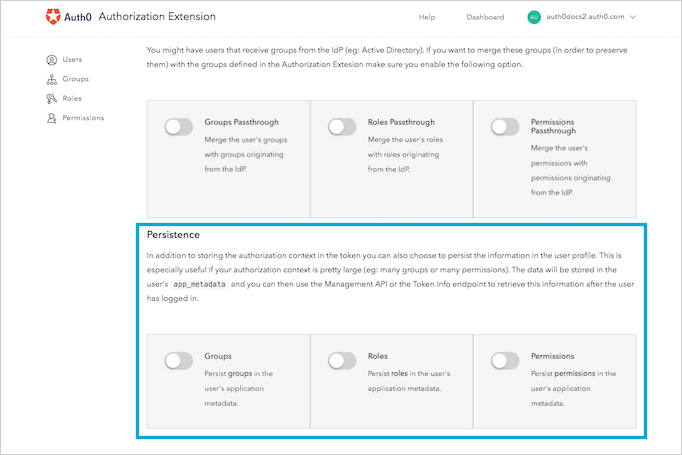
認可コンテキストが大きい場合 (たとえば、ユーザーが多数のグループに属している、または多くの権限を付与されている場合) 、認可情報の一部をユーザーのプロファイルに保存すると便利です。これにより、トークンに保存する情報量を減らせるため、パフォーマンスに関する問題や、トークン発行に関する問題が発生しにくくなります。**永続化** とは、グループ、ロール、権限の情報をユーザーのプロファイルに保存する処理のことです。
データはユーザーの `app_metadata` フィールドに保存され、ユーザーのログイン後に Management API または [Auth0 Dashboard](https://manage.auth0.com/#/users) を使用してこの情報を取得できます。
ルールの変更を保存する
ルールの設定が完了したら、**Publish Rule** をクリックします。これにより、テナントに、各ユーザーのログイン後に実行されるルールが作成されます。
ルールを表示
作成したルールは、[Auth0 Dashboard > Auth Pipeline > ルール](https://manage.auth0.com/#/rules)で確認できます。
ルールを開くと、ルールの設定内容を確認できます。
さらに詳しく
* [Authorization Extension データのインポートとエクスポート](/docs/ja-jp/customize/extensions/authorization-extension/import-and-export-authorization-extension-data)
* [Authorization Extension への API アクセスを有効にする](/docs/ja-jp/customize/extensions/authorization-extension/enable-api-access-to-authorization-extension)
* [Authorization Extension でルールを使用する](/docs/ja-jp/customize/extensions/authorization-extension/use-rules-with-the-authorization-extension)
* [Authorization Extension Dashboard でユーザーを設定する](/docs/ja-jp/customize/extensions/authorization-extension/set-up-authorization-extension-users)
* [Authorization Extension v2 に移行する](/docs/ja-jp/customize/extensions/authorization-extension/migrate-to-authorization-extension-v2)